Showing posts with label recipe. Show all posts

Dec 17, 2008

Scurvy Chaser Tea
(Ginger Rose-hip Tea)

As much as I'd like to claim that beer cures all that ails me and can provide all the cheer I could want on a cold slushy day, my body disagrees and so I must listen. Sometimes when it's snowing and icy out and you've been mostly cooped up with your child who is home from school because no one knows how to drive in snow in your state...you really need something that can give your system a little support, warmth, and enough calm to keep yourself from putting the kid in the dungeon.

This is the tea that can do all that. Ginger is warming to the body and will induce a sweat which makes it useful for feverish infections, colds, flu, and sore throats. It will ease digestion and muscle spasms as well. But what I love best about it is that it has the effect of lifting my mood as well. Rose hips are higher in vitamin C than Oranges and so are a useful fruit to have around in areas where citrus fruits don't grow. Rose hips are also anti-inflammatory making them good for joints.


Ingredients:

1.5" piece of ginger, finely minced
15 whole dried rosehips, or 1 Tbsp dried chopped rose hips
1 tsp honey per cup
1/4 of a lemon per cup (optional)


Method:

Put a kettle of water on to boil. Meanwhile put your ginger and rose hips in a cheerful teapot. Get out a small strainer and line it with several layers of butter muslin*. When the water boils add it to the teapot and close the lid, letting it steep for ten or fifteen minutes. When done steeping, pour yourself out a cup, add the teaspoon of honey, and squeeze some lemon into it. Stir it. Now drink it. If it's not hot enough you may (of course) reheat it.

To get the most out of your dried whole rose hips you may wish to gently boil them for 8 to 10 minutes and then add that decoction to your teapot with the ginger in it. However, it is not necessary to do this to get benefit from them.

I like this without honey or lemon but if I'm feeling under the weather I add honey and lemon because it gives me even more of a boost.


*This is only necessary if you have whole rose hips with the interior hairs still in them. These can cause serious scratchiness and have been used in the manufacture of itching powder! If you are using dried pieces of rose hips then you may skip the muslin completely.

Dec 2, 2008

Homemade Cherry Liqueur

I have been on a cherry liqueur making quest of Arthurian proportions. It started eight years ago in the first home we owned where my homesteading passion was first ignited. Cherries were in "season" and I somehow ended up with an abundance of them. I had this really cool book whose title I no longer recall**that had lots of recipes for staples of a Mediterranean pantry. Among those recipes was one for cherry liqueur. I'm not generally a huge fan of liqueurs but the picture was so pretty, the color so shiny and attractive I knew it was something I needed to have in my own pantry.

It is suggested that you use Morello cherries or another sour cherry variety for best flavor. I had only dark Bing cherries and figured- why not? Because there is nowhere in Sonoma County where you can find or buy sour cherries. A huge oversight on everyone's part there. Another suggestion is that you use 100 proof vodka or some kind of Everclear. I could not locate 100 proof to save my life.

I went ahead and made the liqueur using the Bings and 80 proof vodka. My friend Sharon was inspired by this recipe too and made some as well. Fast forward a few months of letting the cherries steep drunkenly in my kid's dark closet. I pulled it out and admired the rich red color which appeared just as it should. The moment of truth turned out to be a huge let down. It tasted like stewed overly sweet fruit. That's not a taste I like having in my mouth. Sharon's actually did turn out to be very good but she didn't follow the directions exactly and failed to take notes on what she did so none of us will ever know the secret to making good liqueur with sweet cherries.

I tried again the next year and had another spectacular disappointment. Then I did it one more time two years after that and still ended up feeling deflated. Most people would have given up. Instead of giving up I decided that I was going to make a good cherry liqueur if it killed me.

This year was the first time since moving to Oregon that I returned to my old quest for cherry truth. It's not impossible to find sour cherries here which is a huge bonus and one of the reasons why I love Oregon. It is also not difficult to find 100 proof vodka though you have to go to a state liquor store and can't buy it on Sundays. After years of running the gauntlet only to crash and burn I could finally reasonably hope for success. It has seemed to become clear to me that there was a reason for the suggestions that book made.

And there are. Although I long ago got rid of that book because it seemed to have failed me so miserably and set me on this ridiculous path, the recipe I followed this year is nearly identical if you ignore all the things I did. You will need these ingredients:

1.5 pounds sour red cherries, cut in half with the pit left in one side
1.5 cups granulated sugar
2.5 cups 100 proof vodka
small piece of cinnamon

You put a third of the cherries in a half gallon sized jar, then pour a third of the sugar in. Do the next third of the cherries and the next third of the sugar. Then do the last third of both. So it is layered in the jar. If you want to use the cinnamon add it now. Then pour the vodka in. I guess the layering is just for fun because then you stir it all up. Every recipe I've read always calls for layering the ingredients in the jar first. Stir it up, cap it, and then put it in a cool, dry, dark place.

For the first two weeks shake the jar up at least once every day. This makes sure that the sugar completely dissolves. After that let it age for 3 months.

Strain out the cherries and pour the liqueur into bottles.

I have finally made a cherry liqueur worth drinking. It's worth talking about. I have more to say about it but I must post this right now because I have to attend to some business. Please consider making this one next year!

If you do decide to make it but choose not to do it EXACTLY as I've told you- you have only yourself to blame for the results. You should realize that eight years of doing it wrong has really paid off for you because you can go ahead and do it right the first time.


*They really haven't been grown commercially in Sonoma County for many years so they aren't ever technically in season there. But I digress...return to the meat of the story now.

**Because the only recipe I ever tried in it sucked I ended up getting rid of it, now I wish I had it back.

Nov 25, 2008

Mustard Lentil Salad


One of the biggest staples of my fridge is a ready batch of mustard lentil salad. It's good by itself but is even better scooped onto a large bed of lettuce with some feta, croutons, and a hard boiled egg. One of the biggest blessings of this recipe, aside from being very easy, is that it is high in protein and reasonably low in fat. Fresh parsley is an amazing accompaniment to lentils for flavor and for it's vitamins, minerals, and the digestive qualities it offers. I always keep fresh parsley growing in my yard just for this recipe.


Mustard Lentil Salad


Ingredients:

2 cups dry lentils, rinsed
2 Tbsp olive oil
1 onion, diced
2 stalks celery, sliced
2 carrots, sliced med/thin

Dressing:

1/4 cup olive oil
1/4 cup red wine vinegar
1/4 cup of favorite mustard (I used a spicy brown mustard)
1/4 cup (or more) fresh parsley
1 1/2 tsp salt (or more, to taste)
Hell of a bunch of grinds of black pepper


Method:


In a pot big enough to cook two cups dried lentils heat up the olive oil on med/high heat. Add the onions, saute until they start turning transparent, then add the celery and carrot. Saute all the vegetables for five minutes before adding the lentils and covering with water to about an inch above the lentils. Turn the heat down to low and simmer for as long as it takes for the lentils to be cooked through perfectly, usually between 2o minutes to a half an hour. If there is any water left at the bottom of the pan, drain the lentils in a colander and return to the pot, but not to the stove.

To make the dressing for the lentils: In a container that will accommodate an immersion blender add all of the dressing ingredients. Then pulverize it until it is thick. Add to the lentils and stir well.

You can eat the lentils at room temperature, hot, or cold. I nearly always eat it cold as a salad. If you are eating it by itself it obviously needs no dressing, but when I put it on a bed of lettuce I add some dressing to the greens. You can cut down on fat by not doing this but I like a well oiled salad. Plus I like fat.

How I serve it:
I put a big bed of lettuce on a dinner plate. I put about a cup of the lentils scooped onto the top. I add a sliced boiled egg, about a half a cup of croutons (when I'm being conscious, or about a cup when I'm not minding my manners and my waist), and about an ounce and a half of feta cheese.

This is a filling and very wholesome lunch or dinner. It includes protein, dairy, legumes, greens, grains, and a whole heck of a lot of vitamins and minerals. As far as calories are concerned I know that eating it as I often do will land you around 700 calories. If the rest of the food you eat in the day is leaner and smart I think the calories here are very well spent.


Note: If you have one cup of the lentils on one cup of lettuce with one ounce of feta cheese and 1 tbsp dressing for the greens it has only 470 calories. That's also a good way to eat it and not spend so much of your daily calorie intake in one meal. I did the math on this quite a while ago as I eat it a lot and it was a staple when I managed to lose weight the first time (after having a baby. Now I have it all to lose again after breaking my hip!)

Nov 6, 2008

Poorhouse Pies

When most of my bills are a month over due, my husband has developed a tubercular quality cough and we can't afford his asthma medication* or flea medicine for the animals or new pants for the kid it feels a little Irish around here.

It puts me in the mood for cabbage. It makes me want to get earthy and reminds me that the answer to all my problems comes from the same source I did and if I embrace this experience and stop fighting it I will find something soul satisfying in it. Perhaps I'm feeling philosophical because I know that some significant relief will be on its way by the end of the month (in the form of a first pay check from my new job). But I think there's more to it.

Although my family was pretty solidly middle class by the time I came along, my maternal grandparents both grew up very poor. My grandfather was one of thirteen children and as he tells it his home life was pretty dreary and he left home at the age of fourteen to go work. My grandmother (pictured here with my mother) came from very poor people who were (as my grandfather liked to remind us) largely illiterate.

I feel my roots tug at my limbs like hungry children rising from an empty table. I feel it when I dig my own potatoes out of the ground. I feel it when I knife a cabbage into quarters. I feel it when every meal begins with the humble familiar aroma of sauteing onions. I remember reading somewhere a condemnation of the smell of cabbage and onions being the smell of poverty.

To me it's like raw memory. I am the culmination of all the people who came before me in my family and I have their taste in my veins, their scent memories in my cells, their hollering in my head. I love the taste of butter and soil, the smell of damp compost, and the noise of chickens outside my door.

I remember the afternoon when I realized that my grandfather had the soul of a peasant too. I remember drinking wine with him while he read Homer to me and we inhaled the smell of evening coming on. We are simple in our love for books, food, and drink. Perhaps to our detriment.

Then let it be to our detriment.

I've had this idea in my mind for a couple of days. Poorhouse pies. It kept creeping into my mind. Poorhouse pies. The kind of food that you can make for cheap and send with your man to the mines or the fields for later. The kind of food that is rustic and simple but nourishing. Cabbage has 34 mg of calcium per cup. It has 33 mg of vitamin C which isn't bad when you consider that an orange has 54. Cabbage also has 160 mg of potassium. There's good reason why this vegetable has been valued for so long, by common people if not restauranteurs.

Poorhouse Pies pair cabbage and mushrooms together with marjoram, feta, and mustard. It's like a Russian style calzone. It is tangy and satisfying. I used a batch of pita dough because it's what I had ready when I finally decided to make these. I recommend using a calzone dough or making them like empanadas using a pie dough. Though depending on what dough you use your yield will vary.

Is a Poorhouse pie really actually cheap to make? I hear people say all the time that it's cheaper for them to go out to eat (such as at fast food places) than it is to cook at home. This is rubbish. So I costed my ingredients. While prices for things do vary from place to place I rounded up on everything to cover inconsistencies and I came up with a price of $1.66 per pie. These are enough for a light meal on their own or paired with roasted vegetables or salad would make a filling dinner. I think that price puts them at the same price level as fast food.

Except That it will have a lot less sodium, fat, and crap. It has better nutrients to offer and the quality is unsurpassed.

The biggest difference is that you actually have to make them yourself. I made my dough the night before and then put it in the fridge over night. I punched it down in the morning and kept it in the fridge until about an hour before I needed to use it. So these were quick to put together today.

I recommend using a calzone dough because my pita dough was too tender and after the pies sat for a while the juices from the filling made the bottoms a little soft. Otherwise it tasted great. I used feta cheese because it's what I had on hand. My original thought was to use yogurt cheese but I didn't have any prepared. Using yogurt cheese would have cut close to two dollars off the price of making them.

The filling is enough for 8 regular sized calzones.


Ingredients:


Enough calzone dough for 8 calzones

1.5 lbs of cabbage, shredded or diced big
1.5 lbs of button (or any other) mushrooms, sliced
1 yellow onion, diced
2 tbsp olive oil (or butter if you prefer)
2 tsp salt
many grinds of pepper
1 tbsp dried marjoram

8 tbsp stone ground mustard
8 ounces feta cheese (or other cheese of your choice)

Method:

Preheat oven to 425 degrees

In a large saute pan heat up the olive oil on med/high heat; then add the onion and cook until it begins to sweat. Add the mushrooms and cook for about five minutes. Add the cabbage, salt, pepper, and marjoram. Cook until the cabbage is cooked all the way through. About ten minutes.

Cut your dough into 8 pieces. Roll each one out and on one half of it spread out a table spoon of the mustard. Add the cheese on top of the mustard. Then heap about a half a cup of the cabbage mushroom mixture on top of the cheese. Now pull the other half of the dough over the filing and seal the edges of the dough together. You may need to slightly wet the edges of the dough to make it stick well. Take the edges and tuck them up so that the filling won't ooze out during cooking. Place on a baking sheet and proceed the same way to fill the rest.

Sprinkle some cornmeal on the baking sheet if you have some handy. It helps to keep the dough from sticking. Cook the pies for ten minutes (if you use a pita dough like I did, if not, cook for as long as your calzone dough recipe calls for).

If anyone actually makes these, would you mind telling me what you think?


*If it weren't for credit cards it would have been Angela's Ashes for us a long time ago. Philip is waiting to get free asthma supplies from the companies that make them. If you're poor enough they'll sometimes give them out.

Oct 21, 2008

Chickpea Rosemary Soup
Serves 6-8
Calories per 1.5 cup serving: 189


Ingredients:


2 Tbsp olive oil
1 onion, chopped medium
3 carrots, chopped in 1/4" thick rounds
1 (28 oz) can of diced tomatoes (or 1 quart of home canned)
1 (4 oz) can of tomato paste
1 quart water
15 oz chick peas (pre-cooked)
3 cloves garlic, minced small or pressed
2 medium potatoes (any kind) diced to 1/2" cubes
2-3 fresh stems of rosemary, minced very small
1 small head cauliflower, cut into med- sm flowerets
salt and pepper to taste
dash of cayenne


Method:

Snip the rosemary from your garden making sure to stop and take a deep breath of the pungent piney scent before returning to your kitchen. Note how nice it is to have gone to your own plant to get the freshest rosemary on earth.

Heat the oil in a soup pot over a medium high heat and throw the diced onion in. Let the onions cook (stirring frequently) until they are starting to sweat, then throw in the chopped carrots. Continue sauteing for a couple of minutes. Pour in your diced tomatoes, tomato paste, and water and stir well until the tomato paste is dissolved.

Wait until the soup comes to a simmer on medium heat, then add the chick peas, potatoes, garlic, minced rosemary, salt, and pepper. I usually put about a teaspoon of salt in but you can adjust it to your own tastes. I usually put in about ten grinds of fresh pepper.

When the potatoes are tender, add the cauliflower. Now cook until the cauliflower is tender. At the end add the dash of cayenne and stir well.

Please note: you may need to add more water as the vegetables cook depending on how thick you want the soup. If it cooks down and you want it brothier, add more water. If it's too brothy for you, let it cook down with the lid off for a while. I never measure how much water goes into the pot. I can only say that at least 1 quart goes in in the beginning.


Soup is one of the most flexible and forgiving foods. It is warming, nourishing, and easy to make. While soup certainly takes time (this one takes between 45 minutes to an hour) once everything is in the pot it's just a matter of stirring it.

You can use more rosemary than I do here if you like, or less. I always use at least two 3"-4" stems of it chopped fine. I don't like the rosemary to overwhelm the wonderful cauliflower flavor (the most delicately flavored of the cruciferous vegetables). If you don't like chick peas, use white beans. If you have celery, add a couple of chopped stems of it.

The worst mistakes to make with soup:

  • burning it
  • not adding any herbs (dried or fresh)
  • not cooking your legumes enough
  • over-salting (yes there is such a thing)
  • burning your tongue with it
  • not making any
  • over-seasoning it
  • not inviting me over for some


Next up: a rosemary marinade for roasting vegetables with.

Oct 9, 2008


Cherry Tomato Gratin

There are still just enough cherry tomatoes around to make posting this recipe for Michelle worth while. It is an adaptation of a recipe from a book called "The Vegetarian Table: France". What's really great about this recipe is that you can use a ton of your cherry tomatoes all at once and you don't have to cut them. Just wash and de-stem them. This recipe is easy, quick, and so good. The only problem I can find with it is that it doesn't photograph well.

Ingredients:

cherry tomatoes (enough to fill a small to medium casserole dish half way)
ricotta (appx. 15 oz, or however much you get from making one batch of your own)
1 egg
splash of milk or cream
6-10 big basil leaves, julienned
a few grinds of nutmeg (or a few shakes)*
salt and pepper to taste
olive oil for drizzling


Method:

Preheat your oven to 375 degrees.

Put your washed and stemmed cherry tomatoes in your favorite gratin dish. Grind some fresh pepper on them, and sprinkle some salt on them too. Drizzle a little olive oil on them, you don't need much, maybe just a tablespoon or two.

In a medium sized bowl combine your ricotta, the egg, the splash of milk (cream if you like food richer), the basil, and the nutmeg. I always add freshly ground pepper and about 1/2 tsp of salt to the ricotta. If it's home made you may wish to add a little more. Mix the ingredients together well.

Spoon the ricotta over the tomatoes. Smooth it out so it's all covered. You may add grated Parmesan to the top if you like. I rarely remember to add Parmesan, but it's good that way. Cook for 15 or 20 minutes. You want it to cook only long enough to set the ricotta and make the tomatoes hot. If you cook it too long the tomatoes will burst. It will still be delicious, but much funkier looking. What's particularly pleasing about this recipe is how the tomatoes burst their juices in your mouth and how the ricotta adds just the right note of creaminess to the tomato tang.

This is a very healthy dish to eat. You can use low fat ricotta (or nonfat) but be aware that the nonfat has a considerably different texture.


*As strange as I think it is, some people hate nutmeg. If you don't like it, just omit it. But I promise you, it's better with the nutmeg.

Sep 5, 2008

Hummus
a recipe, and a sandwich to put it on

fTo make the best hummus:
Ingredients:

four cups cooked chick peas (garbanzo beans)
four tbsp tahini (sesame paste)
4 large cloves garlic
juice of two lemons
2 tsp ground cumin
1.5 tsp paprika
1 tsp salt
1 bunch bug free parsley

Put all the ingredients in a food processor. Blend it until it's as smooth as you like it. I like mine very smooth. If it's too thick, add water a tablespoon at a time until it reaches the consistency you want. Bear in mind that it will thicken as it sits in the fridge.

The beauty of this recipe is how easy it is to customize it to get precisely the results you want. If you're stranger than me and you like a texture to your hummus, don't blend it as long. If you want more garlic bite to it, add more! You can used canned beans (I used two 15 oz cans for my batch because I don't yet have bulk chick peas to cook up myself.)

If you don't need as much as this recipe makes then cut the batch in half.

And no, I don't know precisely how much this recipe makes because I never measure it afterwords, I just scoop it into a fridge container and use it as needed. If I had to guess I'd say it probably makes about 3.5 cups of it.

The hummus pictured in this post lacks the parsley because of my crazy bug infestation which, frankly, rarely happens to my parsley. I don't even know exactly what they are.

The reason I like this hummus so much more than most I've tasted is that it has a clear fresh flavor which is partly from the lemon and partly from the fresh parsley. I dislike hummus mixes immensely. I don't much care for most store bought tubs of it either. Most of them are bland, or grainy, or include way too much garlic. I like this one for its balance.

Assembling a hummus sandwich for Angelina to eat:
A quick tutorial

You will need:
2 slices wheat bread
homemade hummus
2 slices of heirloom tomato (mine came from Oakhill Organics)
crumbled feta (about two tablespoons...or more...)
about two minutes of your valuable time

First you must toast your bread. Generally speaking I don't toast my bread for sandwiches because the toasty bread rips up the inside of my mouth. But some sandwiches call out to be toasted, and this is one of them. Use good bread. It doesn't have to be fancy, but let it be one with some character and flavor. Mine is from a local company that makes excellent sliced bread called Piontek. There's no weird things in it to make it last longer. And it can't tap dance.

Spread each side with hummus. Resist the temptation to pile it in high peaks because if you do then you will end up wearing it as it explodes out of your bread. That's not pretty. Or dignified.

Sprinkle a bucket some crumbled feta on each side. If you're vegan, omit the cheese. The next step will show you why, if you don't like (or can't) eat cheese you will not be sorry to make this sandwich. I personally can't resist any occasion to use feta.

Now cut two juicy slices of an heirloom tomato and put them in the middle. It is essential that you use a tomato that you grew, or got from someone who grew it near you. It is essential that it be a tasty variety. It is essential that you enjoy how it looks sliced for a few moments because tomato season for most of us is a short period of bliss.

Now you have a sandwich that has a great deal of wholesome protein, grains, and vegetable (fruit) all in one go. Aren't you going to take a bite now? What are you waiting for? Let me just warn you that if you leave it there much longer I will grab it for myself.

This is what I had for breakfast this morning and just moments ago for dinner. I had other dinner plans but as this was so stinking good and I thought about it off and on all day long I couldn't think of any reason to have something different while I still have the supplies for more of this.

Possible variations:

Instead of using sliced bread make an open-faced fresh pita sandwich.

Add lettuce to the sandwich.

Use provolone cheese instead of feta.

Add some roasted eggplant rounds.

Or fresh cucumber.

Mar 5, 2008

Pita For Jesus
The Recipe

This recipe is based on one I've been using from Deborah Madison's cook book "Vegetarian Cooking For Everyone" which is a book I can recommend that everyone have a copy of. It's that good. This is an easy recipe for anyone to make, even if you're not experienced making other breads. If you have a baking stone, put it in the oven right now, before you forget. A baking stone is the best way to bake pitas, though you can use a regular baking sheet if you haven't got one. The stone should heat up with your oven.

Ingredients:

2 1/4 tsp (1 envelope) active dry yeast
1 tsp honey
1 3/4 tsp salt
2 tbsp olive oil (plus extra for oiling the bowl for the dough)
1 1/2 cups multi-grain flour
2 cups bread flour (plus extra for kneading)


Put two cups of water in a large mixing bowl, stir in the yeast and honey, and set aside until foamy, about 10 minutes. Meanwhile oil a bowl for the dough.

If your yeast never gets foamy it's probably dead because you don't bake often enough and you should use some fresher yeast.

Stir in the salt and olive oil
, then beat in the multi-grain flour until smooth. Add the remaining flour in small increments until the dough is too heavy to stir. Turn it onto a counter and knead it, adding more flour as needed, until the dough is supple and and smooth. Form it into a ball and put it in the oiled bowl, turning it to be sure the top is oiled. Cover with towel and set aside until doubled in bulk which should take about an hour.

Punch the dough down
and divide it into 8 pieces if you want large pitas, or 16 pieces if you want smaller pitas. I like the smaller ones better because they are the perfect size for a mini pizza for one. Roll each piece into a ball and set them all aside covered by a damp towel or do as I do and just leave them lying around the counter until it's time to roll them out. At this point preheat the oven at 475 degrees. Let the dough rest while the oven preheats.

This is a great moment to relax and wonder how much wine Jesus drank a day when he wasn't wandering the desert with nothing but the sun to keep him company. You should, obviously, have a glass of your own wine while you thank your lucky stars you don't have to wander around the desert at all. Ever.

When the oven is ready
I roll out as many pitas as I can fit on my baking stone, which is 4 if I'm making large ones, or 6 if I'm making the smaller ones. Place each one on the baking stone and let them cook for a bout 3 minutes each. Mine never completely puff up and I don't know the reason why. Generally speaking each one will at least partially puff up and the occasional one will completely puff up. I check the bottoms of the pitas to see if they're done- they should have only the slightest golden coloring on the bottom.

I roll out the next batch while I'm waiting for the current one to cook. If you happen to have an enormous kitchen you could roll them all out at once, but then you must not stack them on top of each other or they will stick together.

Let the hot pitas cool down on a cooling rack high enough up that my dog doesn't eat them.

Be sure to save one for Jesus.


Feb 20, 2008

Root Cellar Soup
(with extra sharp cheddar)

As so many of are learning to eat seasonally, use our own home canned goods, and even storing winter vegetables in a root cellar, it's important to know how the heck to make use of what we have on hand. If you're me what you have on hand right now is: old potatoes, super hairy carrots, slimy topped celeriac, and some gorgeous onions.

While potato leek soup is a perennial favorite of mine, sometimes you need to figure out a way to add more vitamins to your winter food and use up carrots which are no longer in their prime due to the less than ideal root cellar conditions provided by a plastic bin in your garage. Normally I never peel my carrots, but anyone would have agreed with me that it has become necessary.

I have no celery besides the few packages of frozen celery I put aside for emergencies so I'm using celery root which is in season and gives a delicate wonderful celery flavor. Before moving to Oregon I had only tried to use celeriac once and it did not go well because apparently if you have year round access to avocados and lemons you don't need to know how to grow celery root well. It was harder to find there while here it seems that all market farmers have it (and lots of it) in winter.

The main point though is to use what you have in your root cellar, which at this time of year, is most likely going to be roots. If you have some turnips, use one! If you have rutabagas, use one! The main thing to keep in mind is that the potatoes should still be present in a greater proportion to the other roots for the sake of the consistency and flavor.


Root Cellar Soup


Ingredients:


4 large potatoes, sliced thin in small pieces
4 medium carrots, peeled (if necessary) and sliced in thin rounds
1 celeriac, sliced thin in small pieces
1 onion, diced
2 tbsp olive oil (or butter if preferred)
2 tsp salt
1 tsp dried thyme
fresh ground pepper to taste

In a soup pot warm up the oil on medium/high heat and add the onions and saute until starting to soften. Add the rest of the vegetables and saute until some of the vegetables begin to slightly brown on the pan. You will want to stir frequently to prevent anything from burning. Add enough water (or broth) so that it's about an inch above the vegetables. Add the salt, pepper, and thyme, and put the lid on the pot. When the water has begun to simmer, turn the heat down to medium/low and cook, covered, for about twenty minutes or until all the vegetables are tender.

Turn burner off to avoid burning your whole house down. Use an immersion blender to puree the soup.* Sometimes I like to leave a little bit of texture, sometimes I like it completely smooth. At this point you need to take a little taste to see if you need to add more salt and/or pepper. I don't tend to add tons of salt to my food but I find that of all the things I cook, root vegetables can usually use extra salt.

If your soup is too thick for your pleasure, thin with either cream, milk, or broth. I like to serve it with sharp cheddar and buttered toast.


*If you don't have one of these, get one. Trust me, it is INDISPENSABLE in the kitchen. If you don't have one and aren't going to get one then you'll need to use a conventional blender to puree the soup and I recommend that you wait until the soup is cool before you do it.

Jan 13, 2008

Swiss Chard Egg Scramble

My breakfast comes with some dirt, snail trails, and random feathers, how about yours? I was so lucky to be able to harvest some chard from the garden two mornings ago and also lucky that my hens provided me with a few fresh laid eggs. It's possible that they didn't want me to have them because they were cleverly hidden in the hay. I put my garden findings in a bucket and took pictures of it because I love pictures of food. All food. Then I realized that this was what I was having for breakfast:

Sauteed chard and onion scrambled with eggs, sprinkled with an ounce of cheddar cheese, and laid on a slice of wheat toast with butter.

Swiss Chard Scrambled Eggs:


serves 1

4-5 large chard leaves
2 eggs, (separate the yolks of one)
1/2 onion, medium diced
1 oz cheese of your choice
1/4 cup milk
salt and pepper to taste
1 tbsp olive or vegetable oil
1 slice wheat toast with butter

Put the oil in a medium or small sized skillet and turn the burner on to medium. After about a minute, when the oil is hot, add the onion. While the onion is sauteing, wash the chard and cut it up into small pieces, stems removed. (Don't shake the water off of the leaves or spin it in a spinner.) When the onion is soft, add the chard and immediately put a lid on the skillet to let the steam help wilt the chard. Make sure to stir the chard frequently until it is softened.

Meanwhile, in a small bowl, mix 1 whole egg with one egg white, the milk, and salt and pepper together with a fork. Once the chard is softened, pour the eggs over the chard and onions. Stir the eggs frequently to prevent burning. When eggs are no longer disgustingly drippy wet, add the grated cheese to the top, turn off the burner, put the lid on the pan and let sit for a couple minutes while you make a slice of toast. When the toast is ready, put the eggs on top of it.

Then eat it. So good.

This whole deal will cost you 469 calories*. For such a balanced and healthy filling breakfast I think that's a caloric bargain. However, it would be easy to instantly reduce the calories by skipping the cheese and the toast. You should know that I only use a pat of butter on the toast.

Without cheese: 356 calories
Without cheese or toast: 285 calories


*For calorie reference I use "Laurel's Kitchen" which has nutrition tables in the back, and "The Most Complete Food Counter".

Jan 3, 2008

Broken Rice Salad

I am not normally a fan of wild rice. It's chewy and reminds me of brown rice which I'm also not normally fond of. Brown rice reminds me of eating raw tofu. Which isn't unlike eating chalk. But local grains are hard to come by and I really felt I should try the local wild rice I found here. It comes in two varieties: regular and broken pieces. The broken pieces are less expensive so I bought some of those, also thinking that they might cook up more tender if already broken.

I was not disappointed. I still prefer white Basmati rice to all other rice, but I won't be buying more of that for a long time. (I still have about a cup of it left in the pantry which I'm saving for a rainy day.)

Due to my very circumspect approach to my blog which prevents me from telling you every little detail about me, you probably think I'm a real skinny minnie and have no clue that I am trying to mend some serious cheese inhaling habits which have caused me to expand in the middle quite a bit. You will probably be shocked to know that I am trying to cook some foods that have a slightly lower caloric punch than grilled cheese sandwiches. (Look, just play along, would you?)

This warm salad is what I made for dinner last night and it was both delicious and satisfying, so I'm going to give you the recipe too. You can use unbroken wild rice as a substitute, but then you can't call it "broken" rice salad.

Broken Rice Salad

Ingredients:


2 cups cooked broken wild rice*
4 large carrots chopped
10 Brussels sprouts cleaned and halved
2 med. Yukon gold (or similar) potatoes diced
2tbsp vinaigrette
bottle of favorite dressing**

Steam all the vegetables until tender. Most of them take about five minutes. Test them with a fork to see if they are ready. Put them in a large bowl together and pour the two tablespoons of plain vinaigrette over them. Stir them up to coat with the dressing. The point of the plain vinaigrette is to keep your vegetables from getting dry if you don't eat all the portions of this meal right away.

Add the two cups of cooked broken rice to the bowl and stir well.

Divide into four portions. In each bowl add two tablespoons of your favorite bottled or home made dressing and stir gently. Eat. So good.

Serves 4.
336 calories per serving.
7.5 points per serving.

To reduce the calories or points even further you can try using only one tablespoon dressing on your individual serving. Personally I think that would be madness, but you must be the judge.


Also, if anyone else who is struggling to shed some pounds needs some moral support, please come join me and some friends at our new blog "The Fat Ass Water Cooler" where we are going to try to inspire each other to meet our goals. The main topic of that blog will obviously be weight loss, being fat, and how to change our unhealthy habits into healthy ones. So if you find that talk tedious, don't visit.


*To cook my wild rice I heated a tablespoon of butter in a big sauce pan, then put 12 oz of the rice in the pan and stirred it often for about five minutes on medium high heat until my kitchen smelled like cooking hay, then I added 36 oz water to the pan, turned up the heat to high until the water was boiling. At that point I turned the heat down to medium low and with the lid on the pan let the rice simmer until done which took about 30 minutes. The rice is done when the hulls open up and the rice is tenderish. Let's be honest, wild rice never gets truly tender.

**I used "Riverhouse" Feta dressing that is made by a local company and is a creamy vinaigrette with herbs, feta, and kalamata olives. You can use a plain vinaigrette on this recipe and chop up a little bit of feta and olives if you can't find a similar bottled dressing. But be careful how much you use if you are hoping to keep the caloric value the same.


Dec 15, 2007

Kale and Leek Quiche
A Recipe


It was really good. I inhaled it.

Kale and leek quiche.


The other day when I was craving some dark leafies and bought all that kale, this is the first thing I made. I am a huge quiche fan. Do you know how hard it is to find a good vegetarian quiche recipe? I wanted a reliable recipe that I could use as a sort of quiche template- how many eggs and how much milk will I use each time? I have been working on it for years. Obviously, how much egg and milk you will use depends on how much other crap you stuff into the pastry shell.

I have found that in most cases a quiche requires 6-7 eggs mixed with 1/2 cup milk. If I have put a lot of stuff in the pastry shell, or if the eggs I have are really large, I will usually only need six.

I was lucky that I had a spare already-rolled-out pastry shell floating around in my freezer. As soon as I saw it the words "fresh frozen" came to mind, which reminded me of the conversation my mom and I had at the Golden Valley Brewery with a waitress. My mom was interested in ordering a berry cobbler so she asked if the berries were fresh. The waitress answered uncomfortably that they were "fresh frozen". When my mom said "So, the cobbler is made from frozen berries." The waitress defended the berries "Yes, but they were fresh when they were frozen."

Which is a lot like saying "She was alive when she died."

(This has reminded me of a thought that startled me right as I was about to turn left off of Baker street yesterday:

I really do feel like a coconut.

As though I was in the middle of a conversation with someone in which I am trying to convince their unbelieving ears of this fact. WTF?!)

Back to quiches. I am going to give you the recipe for the quiche I made the other day because there aren't enough vegetarian quiche recipes out there already. This one is really good.

You will need:


one rolled out pastry shell

6 eggs
1/2 cup milk
2 leeks
5 stalks of kale
2 tbsp olive oil
2 tbsp of mustard powder blend (or prepared mustard will be fine too)
2 tsp dried thyme
1 tsp salt
pepper to taste


Preheat the oven to 350 degrees.

Finely slice the leeks and the kale. Heat up the two tablespoons of olive oil on medium high heat in a medium to large saute pan. Add the leeks first and saute until they start to soften. Add the kale and stir frequently. If the kale doesn't wilt and soften within the first two minutes, add a little smidgen of water to the pan and put the lid on for about one minute to steam the kale into submission. Then take off the burner.

Meanwhile, in a medium sized bowl: crack all of your eggs and whisk very thoroughly with the milk, the mustard, and the spices. I prefer to use a fork for this job but I won't judge you if you use an actual whisk.

Add the leek and kale mixture to the pie shell first and spread around evenly. Then slowly pour the egg and milk mixture over it. Pop it in the oven and cook for 40-45 minutes. I always check it when it's been about a half an hour because I've found that the cooking time for quiches are somewhat variable. Generally speaking, when your pie crust turns golden the eggs will have set.

Let cool and then eat the whole thing yourself.


*******

So, what do you all think of my new template? See that super cool header? Angela (of Cottage Magpie) and I took the picture together and then she worked it over with my logo in Photo shop as a surprise for me. I am so tired of the look of my old blog. Yesterday Lisa B. (of The Tardy Homemaker) told me how to add a header picture to a template on blogger and Voila! Am I not super lucky in my neighbors?


Dec 6, 2007

Coffee Liqueur Tutorial


You will need:

1 cup espresso (or very strong coffee)
1 cup sugar
2 cups vodka (80-100 proof)
1/2 vanilla bean split lengthwise

If you plan to make this for gifts you will want to double or quadruple this recipe.


First make your espresso (or strong coffee). Philip has an old Pavoni espresso machine he is very proud of but which I am scared to use because I'm used to using the kind in the coffee houses where you just press a button.

When the espresso is made, mix it with sugar and heat until the sugar is completely dissolved. You don't have to bring it to a boil. Let it cool.

Split your vanilla bean lengthwise to expose the tiny seeds. Put it in a large jar. If you use plastic, make sure it's food grade.

Add your espresso to the jar.

Add the vodka.

Now you must let it sit for two to four weeks before decanting into smaller bottles. If you are planning on giving this for Christmas gifts, obviously you will want to decant it in two weeks. One thing you can do is cut your vanilla bean into smaller bits so that each bottle gets a little piece. If you do it this way you could prepare all your bottles for giving now and not have to decant them later. I did this with my first batch and it worked well enough. However, I like to stick with tradition with some things and the wisdom of letting a whole batch steep together until it's perfect and then straining out the vanilla bean, or fruit, or whatever, seems to me to be a better method.

If you are going to let it all steep together in one happy mess, strain off the vanilla bean before transferring to bottles. With most liqueurs, straining the liquid before bottling is a very good step, I use muslin kitchen towels to do it. This strains off any sediment which makes for a prettier clearer drink. The muslin is tightly woven and so it takes time to do it this way but is rewarding. Another way to do it is to use a few layers of cheesecloth. I recommend taking the time to strain it.

You can substitute one half cup of vodka for brandy if you like. Many recipe variations call for some brandy.

One more note- I have made many liqueurs using 80 proof vodka because I couldn't get my hands on 100 proof. One of the biggest problems I've had is a liqueur that is too sweet with not enough alcohol punch to it. I was lucky this time that I not only got my hands on some 100 proof vodka-but it was also made within inches of my local eating challenge parameter! If you can get 100 proof, use it!


That's it. It's that easy. Most liqueurs will last indefinitely though I did hear from one source that hers went stale within a few months. My last batch was still good two years after making it. A lot of fruit liqueurs aren't even ready to drink until they've aged for three months. It should be stored in a cool dark place.

Now I'm going back to bed to try not to throw up. I've got Max's flu. I just wanted to get this posted as promised. Stay healthy everyone!!

Oct 25, 2007

Vegetarian Pot Pie

I was going to try to make a smaller batch of pot pies so that I could give you a recipe for a normal amount of food. By normal I mean the amount of food you might make for one meal. Then I got to thinking about the reasons I never cook just enough food for one meal. It's because I like to maximize my time in the kitchen, I have to provide lunches too and most of our lunches consist of left-overs, (not to be confused with my Dad's famous MYSTERY MEALS). I always make enough of a recipe to freeze some, or save for lunches in the fridge. That is, in my opinion, a hallmark of an urban homesteader's method of cooking.

So I have decided to give you the recipe in it's large form. If people comment about how they don't know how to cut a recipe in half and wish this recipe was smaller, I may oblige. But I offer this one to all the people out there who are trying to make as much home cooked food as possible and who want to avoid leaning on fast food options by making food ahead of time. Who wouldn't want to pull out a few homemade pot pies on those busy tired week-nights when no one has time to cook?


This recipe is not difficult, but it has many steps and is time consuming. Do it on a day when you have time to hang out in your kitchen and enjoy yourself.

You will need:

For the dough:

2 recipes Martha Stewart Pate Brisee (or enough pie dough for four 9" pies)
1 egg, beaten to a pulp for brushing purposes

For the gravy:

4 tbsp white or wheat flour
4 tbsp butter
1 tsp salt
as many turns of the pepper grinder as you see fit
2 tsp dried thyme
1/2 lb mushrooms, finely chopped
3 cups vegetable broth

For the filling:

3 medium Yukon Gold potatoes, diced (any similar potato will do)
2 large carrots (or 3 medium, you be the judge), diced
1 whole onion, diced
1/2 lb mushrooms, chopped chunky
1 large head of broccoli, cut into small florets, use stem if not too woody (diced)
1 cup of frozen (or fresh if you're lucky!) peas
2 tbsp olive oil


To prepare the vegetables:

Parboil the carrots, potatoes, and broccoli separately (but use the same water each time), for three minutes each. Seriously, trust the three minutes to cook it enough. If you cook your veggies too long they will become an unpalatable mush. If you don't cook them enough, they will have an unpleasant crunch. Whatever you do, don't dunk them in ice water after you remove them from the boiling water. Letting them continue to cook a little as they cool down is essential. Plus it's simpler.

In a large saute pan, heat your olive oil on medium high heat, then add your onion and let it cook for about five minutes. Just as it's beginning to soften, add your chunky mushrooms. Saute for about five more minutes, or until the mushrooms are thoroughly cooked. Put all the vegetables together in a really big bowl.

To make the gravy:

Add vegetable broth powder or a bouillon cube to three cups of the water you used to parboil your vegetables in. Set aside.

In a large saute pan on medium heat, combine the finely chopped mushrooms and 1 tbsp of the butter and cook for about five minutes. Transfer them to a bowl. Mix the 3 tbsp flour with the salt, pepper, and cayenne in a small dish. Melt the remaining butter in the saute pan and when it's just beginning to bubble, add the flour to it and whisk it into the butter. At this point the consistency should be like a paste. If it's looser than that, add a little more flour. Constantly stir it in the pan for about two or three minutes and then add 1 and 1/2 cups of the vegetable broth constantly whisking as you pour it into the flour.

This would be a terrible moment to answer your cell phone.

The broth will thicken quickly, when it has thickened and it is mixed smoothly, add the remaining broth. Now it will take longer to thicken up again. Stir frequently. Once the gravy has thickened, add the finely chopped cooked mushrooms back into the pan. Then add the thyme. It is helpful to rub the thyme in the palm of your hands as you add it to the gravy because it smells heavenly and it will release more of it's flavor this way. Turn the stove down to low and let it cook for another five or ten minutes periodically stirring to prevent sticking. If it gets too thick, add more broth or hot water, but only a little at a time.

Now pour the gravy over the vegetables and mix really well so that all the vegetables are well coated with the gravy.

Preheat the oven to 375 degrees.

To assemble:

Divide each roll of pie dough into four pieces and roll each one out to about 1/8" thick. Line either Pyrex single serving oven dishes, or foil mini pie pans with dough, smoothing out any wrinkles and trimming off the dough at the edge of the dish. You will need those trimmings.


Spoon the filling into the pies, just slightly heaping.

Roll out tops. Place over the pie dish. Trim the excess.

Crimp or roll the edges and slash a couple of holes in the tops of the pies to let the steam out while cooking.

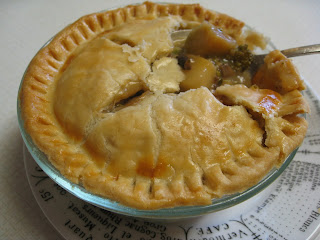
Doesn't this look just like the frozen pot pies of your youth? Yet it will taste better and be healthier too.

Any pies you plan to bake right away you can brush with the beaten egg which will result in the prettiest pie ever. If you are freezing some of your pies I would leave them plain. Put the pies you want to bake right now in the oven for about 45 minutes, or until the crust is golden.

These are the pies I made to freeze. You can buy the tin pie dishes in most grocery stores. I am looking for a paper version because I prefer to cook with aluminum as little as possible. The paper ones are also easier on the environment when they reach the trash heap.

Any pies you would like to freeze should be put directly in the freezer. Once they have frozen, wrap them really well in plastic wrap to prevent freezer burn.


The yield for this recipe will vary depending on a couple of factors. The size of the pie dishes you use and how thinly you roll out your dough. My Pyrex dishes will hold 1.5 cups of filling, and use more pie dough to cover. The mini pie tins hold just about 1 cup of filling and use less dough. I made 8 pies in the Pyrex, and 4 pies in the tins: total of 12 pot pies. I barely had enough dough for all of those. In fact, two of them had top dough only. Philip felt cheated by the lack of a bottom crust.

Now, will someone please make some and tell me what they think?